Battle of Maldon

In August 991, near Maldon beside the River Blackwater, the English fought a battle against the Viking invaders. It was a disaster for the English, and they ended up paying a huge Danegeld to get the Vikings to go away.
Our game this week was a recreation of the Battle of Maldon, using the Crusader rules. These are rules I’ve had sitting on my shelf for over ten years, but have never played them. Mostly because it’s a game that uses bases of figures rather than individual models. I always wanted to keep my figures as individual models, so never got around to building armies for Crusader.
A new club member wanted to recreate the Battle of Maldon using this rule set, in preparation for the Society of Ancients Battle Day event at the end of the month where the battle will be played out using a variety of different rule sets. Since I had the rules, and I had a chance to skim them again, I offered to give it a go.
The battlefield consisted of an island connected to the land via a narrow causeway which was difficult to navigate at high tide. During the actual battle, the Vikings were stuck on the island and the English held the causeway. After a polite request from the Danes, the English agreed to fall back and allow the Danes to come across to the mainland where a fair battle could be fought.
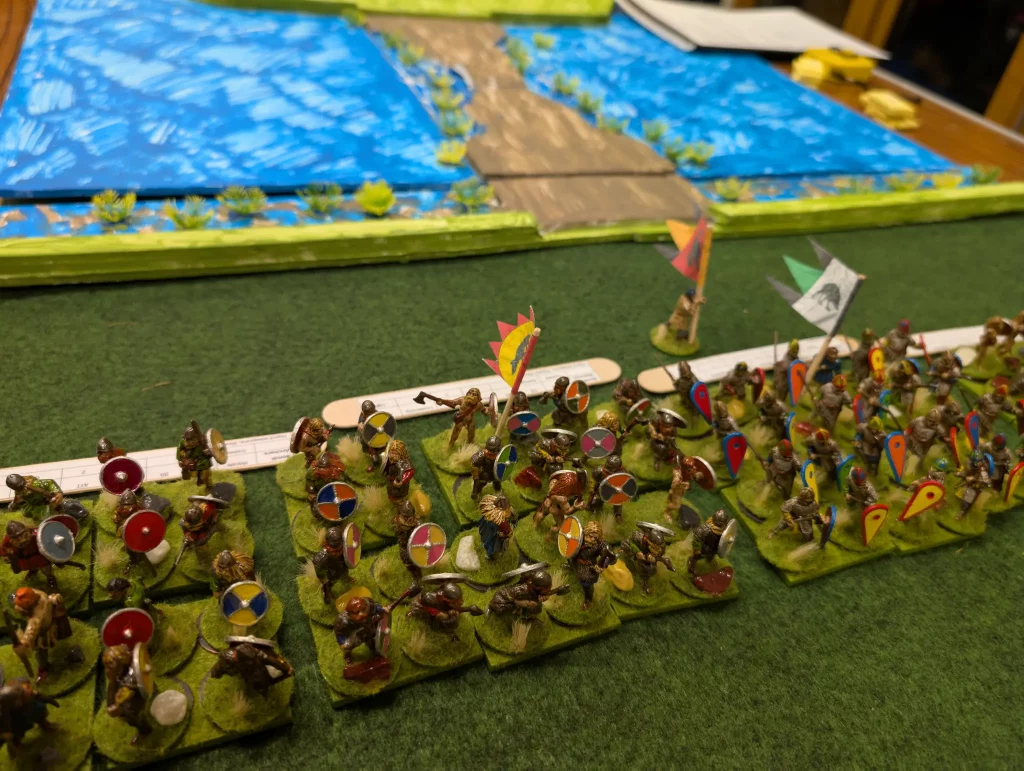
It was this recreation we fought – with both sides lined up by the coast, with little terrain to prevent anything other than a direct clash of armies.
Now, since it was a new game systems, most of my brain power was involved in understanding the rules, so my notes were a little rough.
Unit stats are pretty standard. Each unit has a Morale, and a Combat and/or Bow skill. There are only three levels for the last two (good, average and poor), and Morale seems to be a lot more important in terms of whether a combat is won or not.
Wounds gives how many hits a base can take before it is ‘killed’, and is normally 3. Then you have how many dice to roll for hand to hand and missile attacks. Training and Leadership is used for order checks, such as reforming.

The English consisted of two sets of archers on the flanks, some ceorls and geburs next to them, and a unit of thegn in the middle led by the leader. Several of the units had a shieldwall, but this really didn’t do anything other than give bonuses against shooting. This seems odd to me, but Crusader is not the only game where a shieldwall doesn’t do much.

The Vikings consisted of Danes with heavy axes in the middle, with bondi either side and archers on the flanks. So we were more or less matched, though the Vikings had a small point advantage. We rolled for initiative, and the Saxons went first.
Turn 1
The English had their archers shoot, getting a single hit. Each unit consists of several bases (with four figures per base), in our case 4 or 6. Each base can take 3 hits before it is removed, so a hit just put a marker on one base. Unusually, Crusader uses d10s for most dice rolls, and you need to roll high. At long range, and given the quality of my archers, I not only needed to roll 10s to hit, but also had my dice halved.

There’s quite a bit of calculating each time. You start off needing 6+, and then modify according to the attack/defence skill matrix, and then other modifiers for armour etc. In Lions Rampant, most things tend to be built into the unit stats, so there’s less calculating.

Also note, these modifiers apply to the dice roll, not to the target. In my head, it’s easier to reverse he numbers (so -1 becomes +1) and apply it to the target difficulty.
Normally it’s two dice per base, but in this case I was rolling 4D10 for both units of archers. Their effect though was minimal. This was actually incorrect, in that the rear ranks should have been rolling half dice when shooting. But we missed that until later in the game.
What to do next? I could move forward, but wouldn’t be able to charge the full way across, so in their turn the Vikings would attack me, plus I’d then lose the shieldwall bonus which protected me a bit from arrows. So the English stayed where they were.
The Vikings took their turn of shooting, but they moved up first in order to close the range. In Crusader, a unit does all their actions at once – move, shoot, charge etc. So the archers moved forward and shot. The first unit missed, the second unit got three hits and wiped out a base of my archers, leaving them shaken.
After this, the rest of the vikings shuffled forward.
Turn 2

We rolled initiative, and the Vikings went first this time. This gave them two turns in a row, giving them a big advantage. This time their archers shuttled a little forward and shot again, causing one hit this time. Then the massed ranks of Vikings charged.
This next bit we got wrong. The main melee units had six bases each, and get 2D10 for their HAtak skill. So we each rolled 12D10 in our attacks. I had a vague memory that only the front rank should get to fight, but went with my opponent’s explanation of the rules.
There was some back and forth at this point, though mostly back as far as the English were concerned. I was rolling badly, but not so badly that I rolled 1s – which would allow my thrown weapon equipped units to re-roll their attack dice. In Crusader, both sides roll attacks simultaneously, so both get a chance to maim and kill their opponent.
As I said before, Crusader is a lot more complicated than Saga or Lion Rampant. In these two systems, you might get a single +1 to your roll when attacking. In Crusader, there are a lot of different bonuses, based on how many ranks you have, the quality of your troops, their current status, etc.
Once you’ve done hits, and removed bases, you then roll to see what the effects of the melee were. Just because you killed more bases doesn’t mean that you’ve ‘won’. You might still end up falling back. This is where depths of ranks really have an effect. Again, we got this wrong. But more on that later.
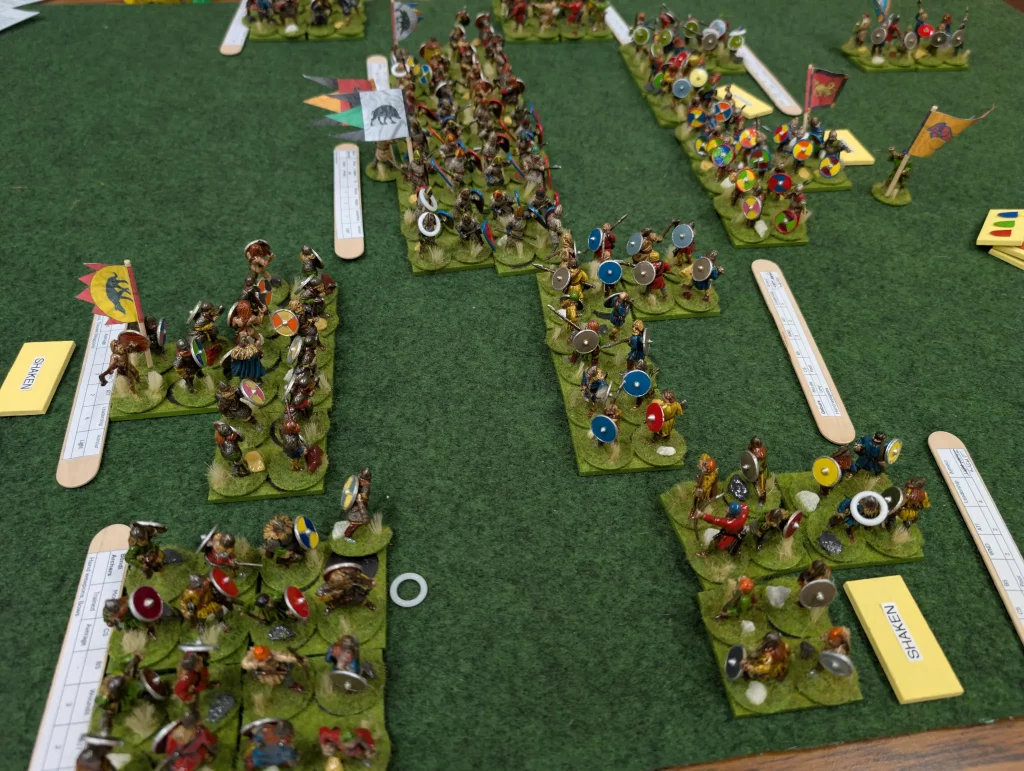
The English took their turn, doing a bit of shooting (taking out a base!) and then trying to recover from being shaken. Only the leader unit succeeded. So they charged, getting 5 hits to the Viking’s 3. They lost two stands to our one, and were driven back. The English unit was actually down to two stands, and I pointed out the rule that a rank has to have at least three bases to count – so my unit was technically zero ranks in depth.
Then my shaken unit takes a charge, but with a -2 penalty to their D10 rolls, they were defeated and routed.
Turn 3
The Vikings went first again. Their shooting did a couple of hits, and then they charged, causing 4 hits and causing another of my units to route. At this point we actually remembered to make morale tests – multiple ones due to multiple units having routed. My leader unit failed their second check, and ran away.

At this point we considered it a Viking victory – just as what happened in real life.
As I said, there was a lot of adding and subtracting numbers for all the different bonuses. Though the units each had a stat ‘stick’ next to them, it could be difficult to see from the edge of the table. We discussed it, and my suggestion was that the stats could be on a sheet, and then have the name of the unit clearly (i.e., a large font) listed on their stat stick. This would make it easy to identify units and link them to their stats on the sheet.
The Bridge

We decided to play out an alternative universe game, where the English did not concede ground and forced the Vikings to fight over the land bridge. I placed my archers along the shore, and put my strongest unit up on the edge of the bridge, forcing the Vikings to meet me in at most a two column wide formation.
The terrain here was quite nice – the middle of the bridge could be removed at high tide when there was basically a ford across the bridge. At low tide, there would be room for three bases to be side by side.
The first two turns consisted of the Vikings moving across the bridge and getting shot at, eventually losing a base during the English turn in turn 3. As the Vikings prepared their charge though, it was determined that they would have to meet me in single file.

My memory at this point was again vaguely remembering rules about base widths and who could fight. Checking the rules this time, and it indeed looked like only bases in contact with the enemy fight. If one unit has a wider frontage, then they can include up to two other bases. So I would have 3 bases to their one. This may have changed the first game – but probably not by much given that we were both very similar in our unit structures.
Given the rule that a rank must consist of at least three bases, they would also count as zero ranks deep. They’d count as being in column formation as well, so as soon as they came into contact with the English, the Vikings would become shaken.
There was some discussion about how to interpret the rules, but it was quite clear to me that without being three bases wide, the Vikings would be at a massive disadvantage. My opponent agreed that this was probably correct, and the Vikings went home.
In theory, the Vikings could wait for the tide to go out and attack when the land bridge was wide enough to fit three units. Then it’s a question of how long they have before the time comes in. If the English could keep them on the bridge, peppering them with arrows, and not giving ground, then the Vikings could be forced to retreat or drown.
Even if they forced their way across, I had two units placed ready to charge in against anyone setting foot on land. And it would be unlikely that the Vikings would be able to get all their forces across quickly enough to be able to have a fair fight.
Overall, it was an interesting game. The alternative battle ran into the problem of how best to simulate it with the rules. Maybe it would have been a clear victory for the English, so possibly it’s not actually a problem (except for the ‘is it fun?’ element for gaming).
In Saga, you might stick 2 points of Anglo-Saxon Hearthguards on the bridge, and have them close ranks (plus other abilities to cripple the attack such as Crash of Shields if you can, and Truce to remove fatigues). If the invaders are played as Vikings (as opposed to Anglo-Danes, or Jomsvikings), then they can be very aggressive, but would also probably be using their abilities to remove their own fatigues to try and push the Anglo-Saxons back as quickly as possible.
In Lion Rampant, you can use Shieldwall or Wall of Spears to increase your armour and stay put. Heavy Infantry would be hard to budge. Give them javelins, and they can shoot from their position without moving.
Both these two games wouldn’t have the manoeuvre issues that Crusader inflicted though. Which possibly makes Crusader a better set of rules when simulating defence of narrow gaps such as this.
For me though, I think I need to be more familiar with Crusader before being able to have a smooth game of it. There wasn’t much movement involved in this game – and movement is a lot more involved since units are formations of troops rather than a small bunch of warriors who can run around however they want.
Crusader also feels that it could scale quite nicely, since I do like big massed ranks of troops (something that attracted me to Warhammer Ancients). However, as I said, I’ve never found a good way to use single figures with based figures.
Warbases do some nice movement trays which could be used, fitting 4 figures to a base. But for 25mm circular bases, that works out at about 60mm wide bases. Even 20mm bases are still 50mm when put on 2×2 figure tray. Since I’ve decided 20mm is a bit too small for 28mm figures (they tend to fall over), I’m gradually moving most of my armies to 25mm circular bases.

Crusader expects infantry to have 40-50mm wide bases, so it’s a bit on the wide side. It may be possible to shave 5mm off the trays, but not much more than that. Magnetic bases and trays are another option, and I’ve tried them before, but I wasn’t too happy with the results. It’s possible to ignore the base size restriction, but only really if all armies involved are consistent.
Anyway, it was an interesting game, and fun to run through the options and rules. Both of us had a slightly different interpretation of the rules, possibly because we were both approaching with different assumptions. It will be interesting to hear though how the final game plays out at the Society of Ancients – and also what other game systems they’ll be fighting the battle with.