Fuel Caches

The Deepnight Revelation has a four parsec jump capability, along with 4 parsecs of fuel capacity. Most of the time, this is sufficient for making progress on its long mission, but sometimes an extended jump is needed where a convenient gas giant or comet isn’t available.
One solution is to make use of fuel caches. Using the expandable fuel bladders which were built with the help of the Erline, it is possible for the Deepnight to build fuel caches in order to extend its range.
Deploying and filling a fuel bladder can be done in a few hours, though a day is normally allowed to make sure that everything goes smoothly. The Deepnight started with 8 bladders provided to it by the Erline, and one has already been used. Each bladder is capable of storing up to 8,000t of fuel, which is enough for a single 1 parsec jump, plus a bit. Fuel leakage happens, but generally this is kept to well within 1% per week, at least initially.
The Deepnight requires 6,975t of fuel for a one parsec jump, so a full bladder of 8,000t is good enough to allow for several weeks of leakage and still contain enough fuel for a journey. When stored, the bladders each take up 80t of cargo space. This has meant a lot of the extra supplies that the Deepnight carries have been removed before attempting the crossing.
More than one parsec of fuel can be deposited via use of the scout ships to empty their tanks to top the bladder up to more than the 6,975t that the Deepnight is capable of itself.
5 Parsec Trip
In this scenario, the Deepnight needs to make a five parsec trip from Alpha to Beta. There are no intervening refuel points on route, so a fuel cache will need to be built at A.
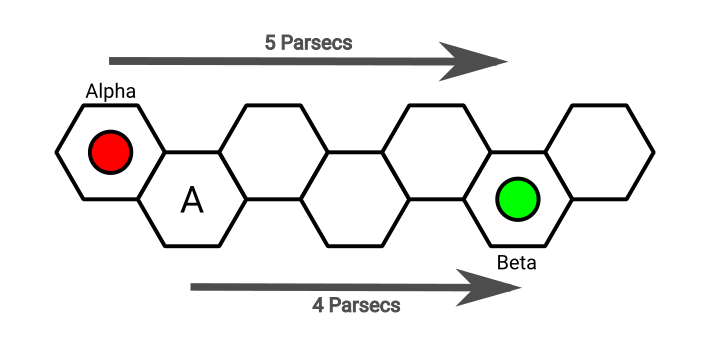
The Deepnight Revelation begins at Alpha world and refuels to its four parsec maximum.
Option 5A
This is the default option, where one parsec of fuel is left at the depot in order to allow for an easy trip back if necessary.
- A one parsec jump is made to A, where two parsecs of fuel is deposited. This leaves the Deepnight with one parsec of fuel.
- The Deepnight jumps back to Alpha, where it refuels.
- The Deepnight jumps to A again, where it refills back up to four parsecs, leaving one parsec in the fuel cache.
- The Deepnight jumps to Beta, completing its trip.
This trip takes four jumps, so assuming 8-10 days for each trip, a maximum of 40 days. One fuel bladder is left at A, where it can be used for a trip back. This permanently uses up a bladder.
As a variation, it is possible to only leave one bladder at A initially, which means none are consumed in the trip. However, this doesn’t save much time (one day to fill the extra bladder), and means a trip back will need to spend time building a second fuel cache from Beta.
Option 5B
Option 5B is similar, but is designed for situations where the fuel cache is expected to last a much longer time. An extra parsec of fuel is stored at A, to account for leakage over a period of many months.
- A one parsec jump is made to A, where two parsecs of fuel is deposited.
- The Deepnight jumps back to Alpha, where it refuels.
- The Deepnight again jumps to A, and deposits an extra parsec of fuel (or two), bringing the cache to three (or four) parsecs.
- The Deepnight jumps back to Alpha and refuels.
- The Deepnight jumps to A, where it refills to four parsecs (leaving two or three parsecs in the cache).
- The Deepnight jumps to Beta.
This process can take 50-60 days, but leaves far more options for a return trip. In the situation where refuelling at the destination is difficult, or a fast return is needed, this is preferable. However, it does require the expenditure of at least 3 bladders.
6 Parsec Trip
A six parsec trip is more complicated and time consuming, since it involves the building of two caches, at points A (one parsec from Alpha) and B (two parsecs from Alpha).
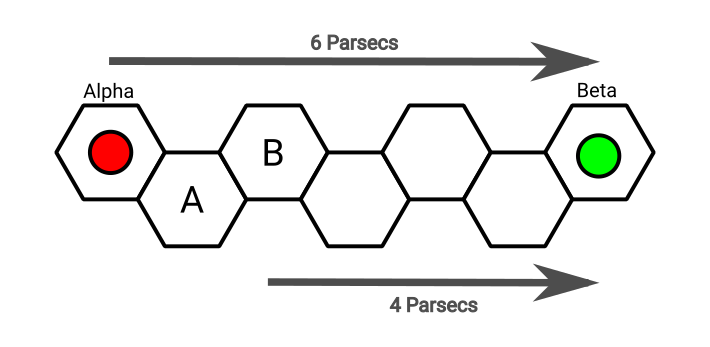
Option 6A
This is the standard option for a six parsec trip, and begins with the Deepnight stationed at Alpha with four parsecs of fuel.
- The Deepnight jumps to A, and deposits two parsecs of fuel in a cache.
- Cache A has 2 parsecs of fuel
- The Deepnight jumps back to Alpha to refuel.
- The Deepnight jumps to A, and takes one parsec of fuel.
- Cache A has 1 parsec of fuel
- The Deepnight jumps to B, and deposits two parsecs of fuel.
- Cache A has 1 parsec of fuel
- Cache B has 2 parsecs of fuel
- The Deepnight jumps to A and refuels from the cache there
- Cache B has 2 parsecs of fuel
- The Deepnight jumps back to Alpha to do a full refuel.
- The Deepnight jumps to A and deposits two parsecs of fuel
- Cache A has 2 parsecs of fuel
- Cache B has 2 parsecs of fuel
- The Deepnight jumps back to Alpha, where it does a full refuel.
- The Deepnight jumps to A and refuels.
- Cache A has 1 parsecs of fuel
- Cache B has 2 parsecs of fuel
- The Deepnight jumps to B and refuels.
- Cache A has 1 parsecs of fuel
- Cache B has 1 parsecs of fuel
- The Deepnight makes the four parsec jump to Beta.
This whole process takes 11 jumps, taking from 88 to 110 days depending on how smoothly the process goes. This leaves one parsec of fuel at both A and B for a rapid return trip, but there are now two points of failure in case a fuel bladder is damaged by a random incident.
Note that given the time required to build the caches, even with topping the caches up from the scouts, and the use of internal fuel bladders in the cargo holds, it is possible that fuel capacity will have leaked to unacceptable levels by the time that the final jump has been made.
Option 6B
This is the slow and safe option, which provides both a fast route back, plus extended fuel caches in case durability is greatly desired.
- The Deepnight jumps to A, and deposits two parsecs of fuel in a cache.
- Cache A has 2 parsecs of fuel
- The Deepnight jumps back to Alpha to refuel.
- The Deepnight jumps to A, and takes one parsec of fuel.
- Cache A has 1 parsec of fuel
- The Deepnight jumps to B, and deposits two parsecs of fuel.
- Cache A has 1 parsec of fuel
- Cache B has 2 parsecs of fuel
- The Deepnight jumps to A and refuels from the cache there
- Cache B has 2 parsecs of fuel
- The Deepnight jumps back to Alpha to do a full refuel.
- The Deepnight jumps to A and deposits two parsecs of fuel
- Cache A has 2 parsecs of fuel
- Cache B has 2 parsecs of fuel
- The Deepnight jumps back to Alpha, where it does a full refuel.
- The Deepnight jumps to A and refuels.
- Cache A has 1 parsecs of fuel
- Cache B has 2 parsecs of fuel
- The Deepnight jumps to A and deposits two parsecs.
- Cache A has 3 parsecs of fuel
- Cache B has 2 parsecs of fuel
- The Deepnight jumps back to Alpha
- The Deepnight jumps to B and deposits one parsec of fuel
- Cache A has 3 parsecs of fuel
- Cache B has 3 parsecs of fuel
- The Deepnight jumps back to A and claims one parsec of fuel
- Cache A has 2 parsecs of fuel
- Cache B has 3 parsecs of fuel
- The Deepnight jumps back to Alpha to refuel
- The Deepnight jumps to A to leave one parsec of fuel
- Cache A has 3 parsecs of fuel
- Cache B has 3 parsecs of fuel
- The Deepnight jumps back to Alpha and refuels
- The Deepnight jumps to A and claims one parsec of fuel
- Cache A has 2 parsecs of fuel
- Cache B has 3 parsecs of fuel
- The Deepnight jumps to B and claims on parsec of fuel
- Cache A has 2 parsecs of fuel
- Cache B has 2 parsecs of fuel
- The Deepnight makes the final jump to Beta.
This is a total of 19 jumps, so a minimum of 152 days, up to 190 days. This is a long time to make a 6 parsec trip, so is not the recommended course of action unless the crew is expecting danger at the far side. It also takes long enough to use up most of the food supplies, so a good supply of food will be needed at Alpha, or at least the promise of food at Beta.
It results in the permanent use of four fuel bladders (and six maximum at any one time).
Option 6C
The final option is a fast travel from Alpha to Beta. Unlike for the 5 parsec route, this actually saves time, but results in no fuel cache being left in reserve for a return trip.
- The Deepnight jumps to A, and deposits two parsecs of fuel in a cache.
- Cache A has 2 parsecs of fuel
- The Deepnight jumps back to Alpha to refuel.
- The Deepnight jumps to A, and takes one parsec of fuel.
- Cache A has 1 parsec of fuel
- The Deepnight jumps to B, and deposits two parsecs of fuel.
- Cache A has 1 parsec of fuel
- Cache B has 2 parsecs of fuel
- The Deepnight jumps to A and refuels from the cache there
- Cache B has 2 parsecs of fuel
- The Deepnight jumps back to Alpha to do a full refuel.
- The Deepnight jumps to B and empties the fuel cache there.
- Cache A has 0 parsecs of fuel
- Cache B has 0 parsecs of fuel
- The Deepnight makes the final jump to Beta.
This while process takes only eight jumps, for a total of 64 to 80 days. It requires no permanent expenditure of fuel bladders. This saves up to 30 days over the standard option. The fewer operations also reduces the chance of something going wrong.
Other Options
Another option involves looking for, or hoping for, comets or similar bodies in the depths of space. These are tricky to find before hand, and will take a very detailed scan before jumping. Comets are more likely to be found around locations with a rogue planet or an unsuitable system.
Again though, it can take many weeks to locate a comet or similar body and travel to it.
Crew Operations
Deploying, filling and refuelling from an external bladder is a non-trivial exercise, but the crew have had some experience with doing this and know what is involved. A DEI (Engineering) check is required, and the results determine the amount of time needed to transfer fuel, and the chance of failure.
| 2D+ Modifiers | Outcome |
|---|---|
| 1 | Bad accident |
| 3 | Accident |
| 5 | Completed in 3 days |
| 7 | Completed in 2 days |
| 9 | Completed in 1 day |
| 11 | Completed in 12 hours |
| 13 | Completed in 6 hours |
The time needed includes post-jump operations, deployment and retrieval of bladders, the fuel transfer operation and pre-jump operations.
3 Responses
-
Pingback: The Crossing – Gaming Chronicles
Very cool. Which of those options are the players leaning towards?
Just done the session, they went for 5B, plus sent a scout ship ahead to check on the destination whilst they were finishing building the cache.