Foundry Update
It’s been quiet around here of late. There was a short break from gaming due to work, then someone was on holiday, then work again and finally failure of somebody’s broadband. It all means we’ve had about a month without a gaming session.
However, I have had time to do some work on my Mongoose Traveller for Foundry. I’ve been making a few videos over the last few months, but it’s probably time for a bit of a text update.
Character Creation
I’ve tried to make character creation as smooth as possible, and the following notes are probably worth being aware of.
Setting player permissions so that they can create their own characters will make life a little bit easier at the start. As a GM, you won’t need to create an actor for every player and then assign it to them.
If you also allow permissions so that players can use the File Browser, then they can select a character portrait themselves as well. You may have to upload their choices to the Foundry assets folder (unless you also give them permission to upload files), or you can provide a set of common portraits to select from.
The two permissions are:
- Create New Actors – This allows a player to create their own character.
- Use File Browser – This allows a player to select artwork for their character’s portrait
When a player creates their first character, it will automatically be set as their default character. This means certain actions will default to that character during character generation, making life that little bit easier.
Macros
There are a number of macros built into the system which are designed for use in character generation. They can be specified in a journal, or in an item or actor description. When clicked, they will be executed on the currently selected character. If the user has a token selected, then the character for that token will be chosen.
If no tokens are selected, and the user has a default character set, then that character will be used. This is why it’s useful for each player to set a default character. Note that if the user is a GM, then the default character is ignored. It’s assumed that the GM will be switching between multiple characters, and falling back to the default is unlikely to be the right one.
In order to show off how they are used, the system (from 0.15.1) now ships with an example career. This demonstrates how to build your own careers, or just generally how to use the macros.
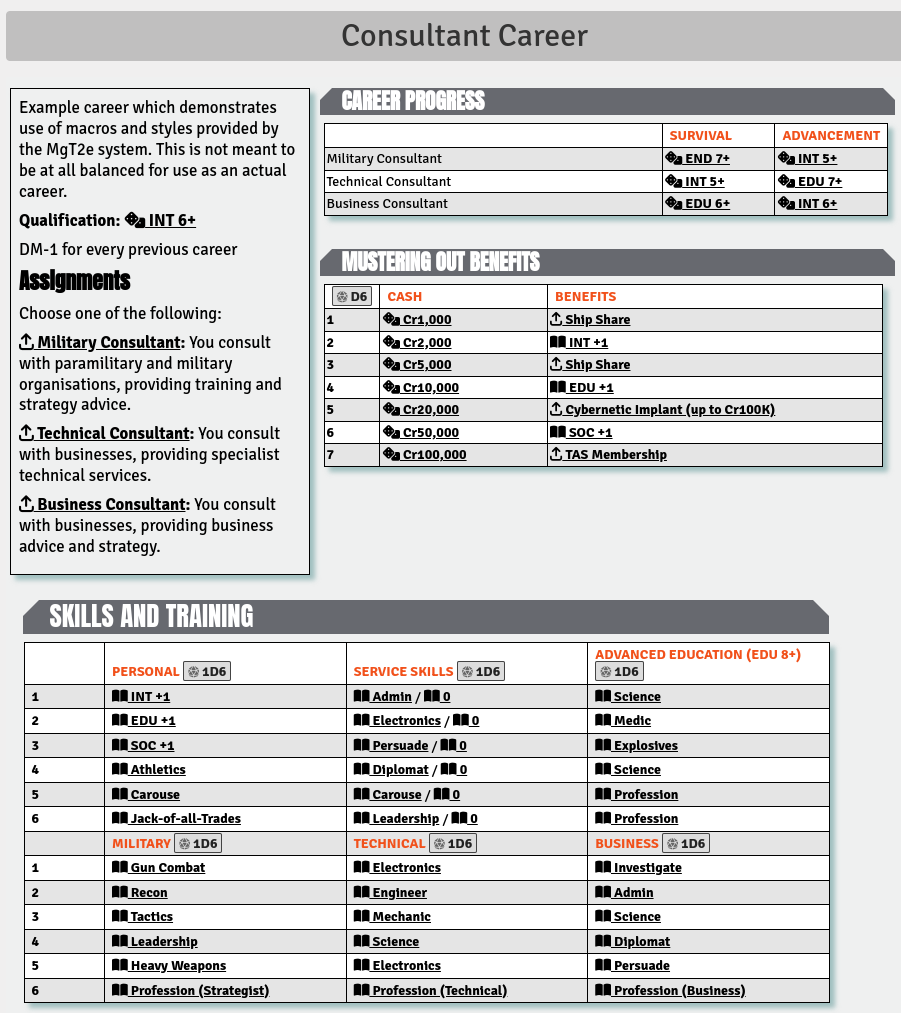
If the journal is edited, then you can see how the macros are used to help the character build process. For example, editing the top of the career page, we can see the macro definitions in the text:
The idea behind this is that the player and GM still need to know how character generation works in Traveller. The system doesn’t hand hold you through the process and tell you want needs to be done next. However, it also doesn’t force you to do things in a particular way.
Instead, the idea is to try and streamline some of the process. It doesn’t tell you to make a qualification check, but there is a link you can click which will make the check for you, and tell you the result. Likewise, clicking a benefit link will add the benefit to your character sheet. It won’t prevent a player from adding as many benefits as they want to, but at least it will output what’s been done to the chat.
Note that the flavour text that appears in { } following each macro is what appears inline in the journal entry as the link. If this isn’t provided, then players will see the macro command itself, which isn’t always desired.
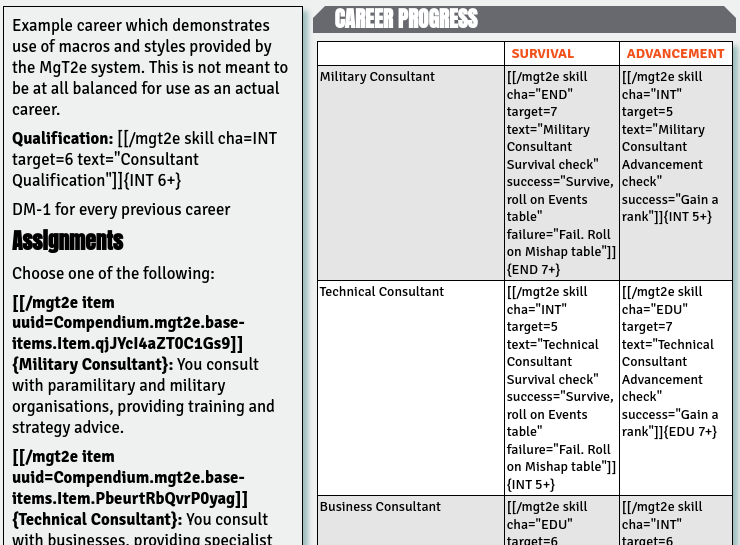
[[/mgt2e skill cha=INT target=6 text=”Consultant Qualification”]]
This makes a skill check, against a target of 6, using just the INT of the character.
[[/mgt2e item uuid=…]]
This adds the specified item to the character. In the case of these examples, the items are Career Terms, which will be added to the character’s history tab. Unfortunately, updates to the character during character generation aren’t automatically added to the career term item. This will need to be done manually by the player.
The [[/r D6]] at the top of the table simply rolls a die. It doesn’t select the table entry. However, it outputs a text description (everything following the hash) to the chat along with the result.
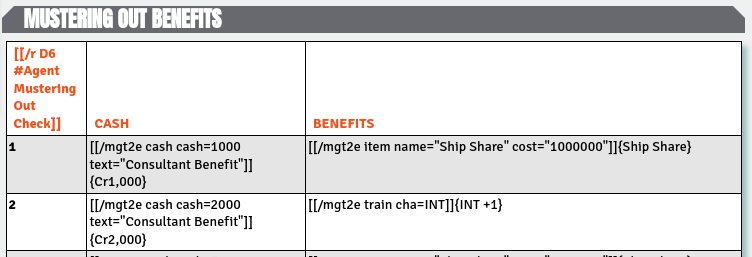
[[/mgt2e cash cash=1000 text=”Consultant Benefit”]]
This adds cash to the selected character. It’s also possible to add pensions and medical debt rather than straight cash.
[[/mgt2e item name=”Ship Share” description=”benefit” quantity=1D3 cost=”1000000″]]
This is another way of adding an item. Rather than pointing at a specific item, it will creating a new item using the details provided. The quantity can be a fixed number, or a dice formula.
[[/mgt2e train cha=INT]]
This increments a characteristic by 1. You can also specify a level, in which case the characteristic is increased by that amount. The level can be negative. Alternatively, you can specify min, in which case the characteristic is raised to the minimum value, or incremented, whichever is best.
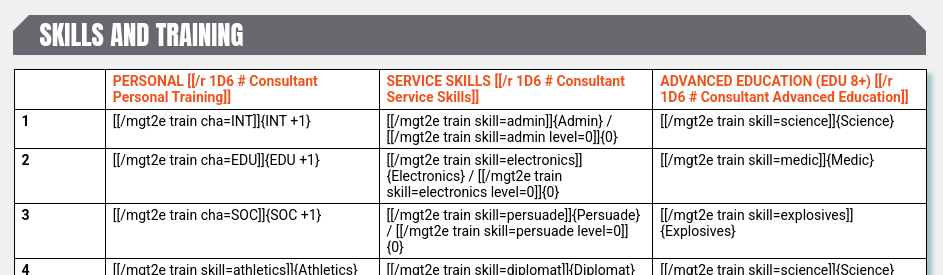
For the skill training table, it all uses different variants of the [[/mgt2e train …]] macro. Training of a characteristic has already been described above.
[[/mgt2e train skill=admin level=0]]
This is for adding a service skill at level 0. If level is set higher, then the skill is set to that level if it is currently lower. If the skill is equal or higher, then no change is made.
[[/mgt2e train skill=admin]]
This increments a skill by +1, to a maximum of four. If the skill is untrained, it is set as trained at a level of 1. This is the most common way to train a skill.
[[/mgt2e train skill=science]]
This looks the same as the above macro, but behaves slightly differently because science is a parent skill with lots of specialisations. If you want to train a specific specialisation, then you can specify the fully qualified skill name, e.g. science.biology. If you don’t include the specialisation, then a list of possible skills are output to the chat for the player to select from. The current skill levels are displayed, and only specialities that can be improved are shown.
[[/mgt2e train skill=profession.technical sname=”Technical”]]
In this case, the “Profession (Technical)” skill isn’t a default skill, so clicking this macro has to create the skill on the character sheet. If sname is specified, then the speciality will be created if it doesn’t exist. If sname isn’t specified, then trying to train a skill that isn’t on the character sheet won’t work.
[[/mgt2e train skill=alchemy name=”Alchemy”]]
Similar to creating a new speciality, it’s also possible to create a completely new skill.
[[/mgt2e skill cha=- skill=deception target=8 text=”Avoid prison” success=”Avoid” failure=”Go to prison”]]
This is another way of making skill checks. In this case make a deception skill check, but without any characteristic. If a real characteristic is defined, then that will be used. If cha is not given, then the check will default to the default characteristic for that skill.
The success and failure messages are automatically printed depending on whether the skill check is a success or failure. These are optional, and both, either or none can be specified.
The text string is displayed in the skill dialog box, so the player knows what skill check is being made.
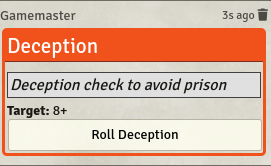
If the GM clicks this macro without a character selected, then a skill request is sent to the chat. This has a button which any player can click in order to make the skill check. Rather than using the skill command, you can use skillReq which forces this behaviour.
This is most useful for adventures, where an adventure might require a skill check from characters. The GM can click the macro, and the request goes to the chat rather than players having to fiddle around looking for the skill on their character sheet. Any player can click the button to automatically make the skill check.
[[/mgt2e associate type=rival name=”Partner” description=”Old business partners” number=1D3]]
This macro allows associates to be automatically added to the character. The type can be one of rival, contact, enemy, or ally. If the number is given, then this can be a number or a dice roll. The associate is added as an item which appears in the character’s History tab along with their career terms.
Together, the above macros are meant to make the process of creating a character a bit easier. Mostly, it’s there to simplify the process of getting information onto the character sheet, without taking away control of what goes onto the character sheet from either the player or GM.
Hopefully, there’s enough detail here to help GMs create their own careers, or use the macros when producing their own content. It’s also been heavily used in the official content compendiums which are being worked on, so GMs don’t have to do all the work themselves.